Writes about Microsoft 365, Intune, Purview, SharePoint, Teams, Defender and more

Tag: Yubi

Let me tell you something about FIDO2 key authentication Part 2

Welcome back to part two of our FIDO2 blog series! In part one, we explored how to enable FIDO2 key authentication in Microsoft Entra and how to register the key for a user. In this post, we’re diving into the next piece of the puzzle—configuring Windows Hello for Business (WHfB) in Intune to allow FIDO2 key sign-in.

This step is crucial if you want a consistent passwordless experience across your Windows devices, including desktops, laptops, and even mobile (yes, we’ll get to on part 3 of this series!).

Table of Contents:

  1. Introduction
  2. Prerequisites
  3. Enable Windows Hello for Business in Intune
  4. Enable Windows Passwordless Experience with an Intune device policy
  5. Testing the new sign in experience on a windows device
  6. Resetting the Fido Key
  7. Conclusion

1. Introduction

If you’re planning to roll out FIDO2 keys as a sign-in method, configuring Windows Hello for Business in Intune is essential (especially since this method is more tailored to corporate environments and not something an average user would typically set up in his environment).

Without this method , users can authenticate in browsers or mobile apps but not directly from the Windows lock screen.

Let’s fix that!

2. Prerequisites

Before we start, make sure you meet the following requirements:

Users need an Intune device configuration policy that enables Windows Hello for Business
Devices must run Windows 10 version 1903 or later, or Windows 11
Devices should be Azure AD joined (or Hybrid Azure AD joined)

3. Enable Windows Hello for Business in Intune

We want to enable FIDO2 key authentication across all Microsoft systems and for various scenarios. This will allow users to authenticate with the key on a webpage, mobile device, and of course, their personal computer.

Follow the steps below to enable this method within Windows Hello for Business:

  1. Open the Intune Admin Center and go to Devices.
  2. Select Enrollment from the menu.
  3. Choose Windows Hello for Business.
  4. Enable Windows Hello for Business by toggling it on (if it’s not enabled already).
  5. Scroll to the bottom and ensure Use security keys for sign-in is enabled.
  6. Click Save to apply the changes.

If it’s already enabled by your organization, you can skip this step.

4. Enable Windows Passwordless Experience with an Intune device policy

To ensure a full passwordless experience—including Windows Hello for Business sign-in at the lock screen—we also need to configure a policy in Intune.

This setting is needed to make passwordless sign-in work on the Windows lock screen using Windows Hello for Business. Without it, users can still sign in with a FIDO2 key in the browser or on mobile apps, but not directly on the device.

Below are some specific considerations for this part.

And this is how to create the policy in Intune:

Open a browser and go to the Microsoft Intune admin center and follow below steps:

  1. In the left-hand menu, go to Devices.
  2. Click on Configuration and then select
  3. Create to start a new policy.
  4. For Platform, select Windows 10 and later.
  5. For Profile type, choose Settings catalog.
  6. Click Create to continue.

Give the policy a name and continue

In the next page follow below steps:

  1. Click on + Add settings
  2. In the Settings picker, type “Use security key for sign-in”
  3. Select Windows Hello for Business
  4. Under Settings name, select Use security key for sign-in
  5. Set the option to Enabled

If you make use of scope tags or want to target a specific assignment group (for testing, for example), go ahead and select those. But in our case, we want all Autopilot devices to have this option enabled by default:

If everything looks good, press Next and then Create to enable and deploy the policy.

Once this policy is applied, users will be able to use FIDO2 keys right from the Windows sign-in screen—no password needed. So let’s go ahead and test it out.

5. Testing the new sign in experience on a windows device

In the previous blog, we walked through how to configure and register a FIDO2 key as an authentication method for your user account. If you haven’t done that yet, I recommend checking it out first.

Now that your our FIDO2 key is already set up, let’s test it out for a passwordless Windows sign-in:

Steps to Sign in with Your FIDO2 Key

  1. On the Windows lock screen, click Other user and click on Sign in options

2. You’ll now see a new option: Sign in with a security key. Insert your FIDO2 key into the USB port and click the option. (Since the key has already been configured, you’ll be prompted to enter your PIN code).

Enter the PIN code you created during setup and press Enter.

3. You will get asked to touch the key when the key’s green Y light flashes, touch the key to continue.

If everything went well you will see the famous Windows Hello logo:

🎉 Congratulations, you’ve just completed your first passwordless login on Windows using a FIDO2 key!

6. Resetting the Fido Key

If you want to change the PIN code or reset the Fido key entirely, download the YubiKey Manager. After the usual next, next, next, the program will launch. Click on Applications, select FIDO2, and choose either Change PIN or Reset FIDO2.

You’ll be prompted to touch the key to verify that it’s in your possession.


7. Conclusion

And that’s it! You’ve now successfully configured Windows Hello for Business to support FIDO2 keys and tested the full sign-in experience—from inserting the key to logging in without typing a password. This is a big step toward a truly passwordless future in your organization and for users to not have to change the password so many times as that’s really something of the past imo.

In the next part of this series, we’ll show you how to use the FIDO2 key for secure Privileged Identity Management (PIM) role activation. That one’s especially important for admins and high-privilege users, so make sure to stick around!

Until next time—stay secure and password-free! 🔐

Let me tell you something about FIDO2 key authentication Part 1

In today’s blog, we’re kicking off our series on FIDO2 key authentication by exploring how to set up FIDO2 hardware key sign-in for Microsoft services. This secure, phishing-resistant multi-factor authentication (MFA) solution not only boosts security but also simplifies the login experience.


Table of Contents:

  1. Introduction
  2. Enable the FIDO2 Authentication method in Microsoft Entra
  3. Add the sign-in method for the user
  4. Test the FIDO2 key method using web logon
  5. Conclusion

1.Introduction

In this day and age protecting access to corporate resources is more crucial than ever. FIDO2 keys offer a simpler, more secure alternative to password-based authentication, eliminating the need for frequent password changes.

In this blog, we’ll guide you through setting up FIDO2 key authentication in Microsoft 365 and show how users can securely access their data.

Because let’s be honest, who hates changing their passwords every month? I know I do!
With a FIDO2 key , we can finally move to a passwordless future and ditch the hassle of remembering and updating passwords.

2. Enable the FIDO2 Authentication method in Microsoft Entra

Prerequisites:

At least an "Authentication Policy Administrator" role
A Microsoft certified Security key (we use the FIDO2 NFC Yubi Key)
Entra joined computers (for Windows Hello for Business)


First things first, before users can take advantage of FIDO2 key authentication you need to enable it as a supported sign-in method in Microsoft Entra.
Follow these steps to get started:

Steps to Enable FIDO2 Key Authentication in Microsoft Entra

  1. Open a browser and go to the Microsoft Entra Admin Center.
  2. Login with an admin account that has at least the Authentication Policy Administrator role.
  3. In the search bar, type in “auth methods”
  4. Select the “auth methods” service

Configure the passkey method

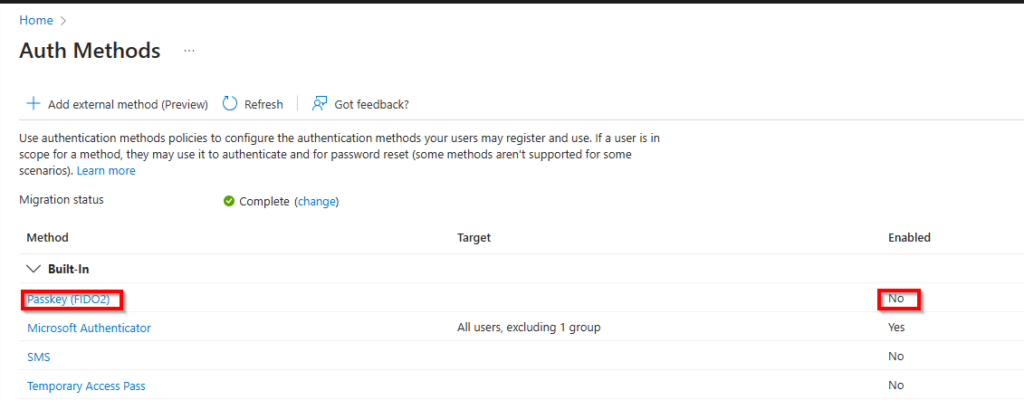
In the list of authentication methods, locate “Passkey (FIDO2)”.

As you can see, the method isn’t enabled yet and needs to be configured. Click on it to start the process.

I recommend starting with a test user group. Once you're confident everything is set up correctly, you can either keep the current group, switch to another group or enable this method for all users.

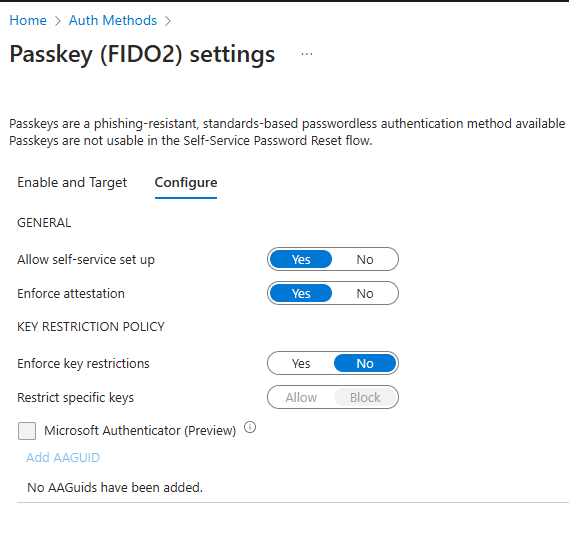
Now we need to configure the policy, follow:

  1. Enable the Policy
  2. Toggle the policy to Enabled.
  3. Select the Target
    Choose whether to apply the policy to all users or specific groups.
  4. Add Groups (If Applicable)
  5. If you selected the group option, click Add groups, choose your desired groups, and click Configure.

These are the settings I used for this scenario. If this is your first time setting up FIDO2 keys, I wouldn’t recommend enabling key restrictions just yet. There are tools available to identify the AAGUID on your FIDO2 keys, but let’s keep things simple for now.

Once you’ve configured the settings to your liking, click Save to enable the FIDO2 key authentication method.

As you can see, the policy is now enabled. This means you can now add this authentication method to a user, allowing them to start using the security key for authentication/passwordless sign-ins.

It can take between 5-45 minutes before the method is available to use. If it doesn't work right away don't panic, it will eventually be available to you. 


3.Add the sign-in method for the user

After enabling the FIDO2 authentication method and configuring the security key as a sign-in option for Windows Hello for Business (which we’ll cover in a future blog), the next step is to assign this method to a user who is a member of the FIDO2 Token Group we specified earlier.

Here are the steps to add the sign-in method to a user:

  1. Go to the My Sign-Ins Portal and add sign-in method
    • Navigate to My Sign-Ins.
    • Sign in with your Microsoft account.
    • Once signed in, click on “Add method” at the top of the page.
  2. Select Security Key as the Method
    • From the dropdown menu, select “Security key”.

3. Choose the Key Type

  • Select the type of security key you are using:
    • USB Device: For keys that connect via USB.
    • NFC Device: For keys that connect wirelessly using NFC.
  • Our key has both capabilities but we will choose USB device for now.

4. You’ll be prompted to insert the key into the USB port. Once the key is inserted, click Next to begin the pairing process.

You will now be redirected to a new page to set up the passkey.

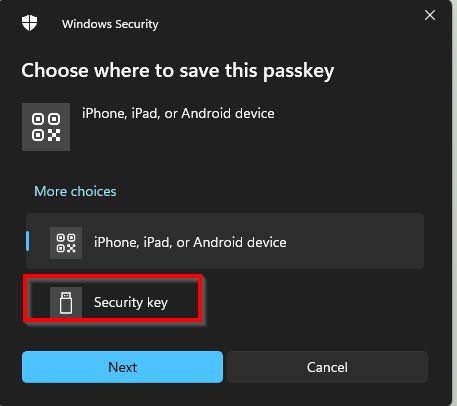
5. Next, choose where you want to save the key. Select Security key and click Next.

6. You’ll see a couple of confirmation screens from Windows Security. Click OK twice to continue.

7. If you have a new key (and I assume you do), you’ll need to create a PIN for it. Enter a new pin code twice and click OK.

8. This is where the key truly excels. You’ll be prompted to touch the security key. The Y indicator will turn green, signaling that you need to touch it. This adds an extra layer of security, as only someone with physical access to the key can complete this step—making it hacker-proof.

FIDO2 key

We’re all set! You’ll be asked to give your FIDO2 key a name and to save it.

The authentication method has been successfully added and can now be used across all Microsoft services/

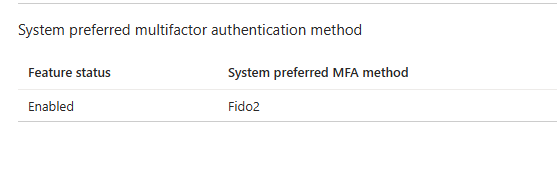
Your preferred authentication method has also been updated to FIDO2, as it offers a more secure option than the Microsoft Authenticator.

4.Test the FIDO2 key method using web logon

Below are the step to test the Fido2 key sign-in method on the Microsoft portal.

  1. Go to a Microsoft Portal page
  2. Select Sign-in options

3. Select the Security key option

4. Select Different Passkey if the system detects a previously saved key, such as a Windows Hello for Business key.

5. Select the security key option

6. If you’re prompted with other options instead of the key, select Use another device and choose Security key, then click Next.

FIDO2 key

7. Enter your security pin and touch the key to continue.

You’ve now successfully completed your first passwordless sign-in!

5. Conclusion

In conclusion, FIDO2 hardware key sign-in provides a secure, phishing-resistant authentication method while offering a passwordless login option. It enhances security and improves user experience by eliminating the need for complex passwords. Microsoft now recommends against password expiration, as users often forget them or write them down, which can undermine security.
This marks a shift from past practices where expired passwords were seen as more secure and you got extra security score point for it!

In the upcoming parts of this blog series, we’ll dive into configuring Windows Hello for Business to use FIDO2 keys, including how to sign in with this method on mobile devices. Additionally, we’ll explore how to use the FIDO2 key for secure Privileged Identity Management (PIM) role activation. Since this topic is quite detailed and long , we’ve divided it into a three-part series to provide a thorough understanding of each aspect. Stay tuned for part two and three!