Writes about Microsoft 365, Intune, Purview, SharePoint, Teams, Defender and more

Category: Microsoft 365

Let me tell you something about FIDO2 key authentication – Part 3

Welcome back to the final part of our FIDO2 blog series!

In Part 1, we walked through enabling FIDO2 key sign-in in Microsoft Entra and registering the key for a user. In Part 2, we looked at how to use the key for Windows Hello for Business using Intune. In this final post we’ll explore how to use the FIDO2 key to activate privileged roles, like Security Administrator, using Microsoft Entra’s Privileged Identity Management (PIM) and a bonus section!

This is where things really come together. Not only is your sign-in passwordless, but now your privileged role activation is phishing resistant and far more secure (and for IT Admins this might be the best part in the series 🫡).


Table of Contents

  1. Introduction
  2. Why FIDO2 as an MFA method?
  3. FIDO2 as an authentication method for PIM roles
  4. FIDO2 as authentication strength in Conditional Acces
  5. Configure the PIM role with the Authentication Context
  6. How the PIM role works in practice
  7. Bonus section part 1: Set up Temporary Access Pass (TAP) for onboarding
  8. Bonus section part 2: Testing the new sign in experience on a mobile device
  9. Final thoughts

1. Introduction

These days, traditional MFA isn’t always enough—especially for high-privilege roles or emergency break glass accounts

Starting on October 15, 2024, to further increase your security, Microsoft will require admins to use multifactor authentication (MFA) when signing into the Microsoft Azure portal, Microsoft Entra admin center, and Microsoft Intune admin center

For those scenarios, using a FIDO2 hardware key adds an extra layer of security that’s phishing-resistant, tied to something physical and can be used by multiple people that have access to the key. Think of a key stored in a safe, only used when absolutely necessary, or required for sensitive role activation. In this blog, we’ll walk through how these keys can help make identity protection even stronger where it really counts.


2. Why FIDO2 as an MFA method?

FIDO2 keys are:
✅ Phishing-resistant
✅ User-friendly
✅ Supported across multiple platforms (also on mobile devices, see bonus section!)
✅ Capable of passwordless sign-in and acting as an MFA method

This is particularly useful when you need to satisfy MFA requirements without relying on personal phones or Authenticator apps. It’s a great alternative for IT admins, users in secure environments and external users who need temporary access to your environment and especially when you want to avoid the hassle of installing and configuring Microsoft Authenticator on their phone.


3. FIDO2 as an authentication method for PIM roles

To allow users to register and use FIDO2 keys see my previous blog.
If you want to go completly passwordless and only use/allow FIDO2 key as an authentication method for users or admins we need to enable the Temporary Access Pass (TAP) first (see bonus section).


4. FIDO2 as authentication strength in Conditional Access

Now let’s start with configuring the FIDO2 key when activation PIM roles.

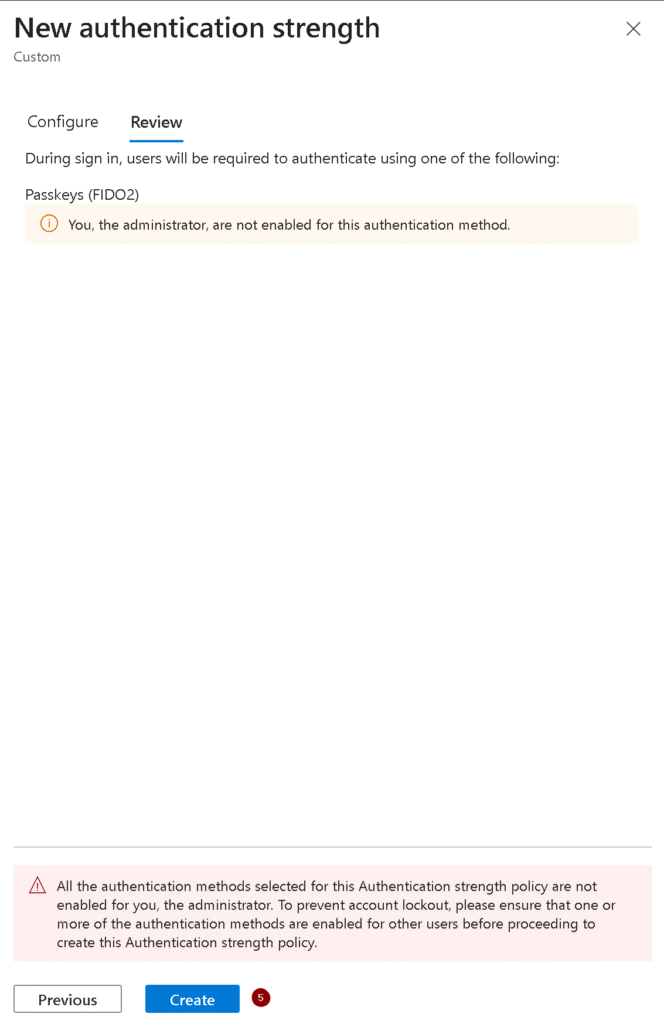
To ensure that PIM role activation requires the use of a FIDO2 key, we need to create an Authentication Strength policy.

Here’s how:

  1. Go to Microsoft Entra → Protection → Conditional Access → Authentication strengths
  2. Click + New authentication strength
  3. Name it something like: FIDO2 Only - High Privilege
  4. Under Methods, select only FIDO2 Security Key (you could click on advance options and limit the GUID’s by only adding your Fido2key, but we will skip this step for now).

5. Read the warning and click Create
Steps to Configure FIDO Key Requirement for PIM Role Activation (Security admin for example).

1. Create a Conditional Access Policy for FIDO Key Enforcement

To enforce the use of FIDO keys during role activation, configure a Conditional Access Policy as follows:

  1. In the Entra Admin Center, go to Protection> Conditional Access.
  2. Click + New policy and name it (e.g., “Enforce FIDO2Key for Admin Activation or something that’s clear for you”).

3. Create a new Authentication Context to use for the Conditional Access Policy.

Give the authentication context a name that uses some consistency so you know what the relation between the authentication context and strenght is later on, publish it to apps and click Save.

4. Create the Conditional Access policy

  1. Give the policy a name (mine is CA017 – Enforce FIDO2Key for Admin Activation)
  2. Assignments:
    • Users or workload identities: Select the Security Administrator or other roles.
    • Target resources: Choose All resources.
  3. Conditions (optional):
    • Add conditions such as specific (corporate) locations or compliant devices if required.
  4. Access Controls:
    • Select Grant, then enable Require authentication strength.
    • Choose the FIDO2-Key-High Privilege-Roles
      authentication method that we created earlier.
  5. Turn the policy on and click on Create.


5. Configure the PIM role with the Authentication Context

  1. Navigate to Identity Governance > Privileged Identity Management.
  2. Under Manage, select Microsoft Entra roles and click Roles,
  3. Search and select Security Administrator.

4. Configure PIM Settings for Role Activation

Select the Security Administrator role, then go to Settings and select Edit.

Now we need to configure the role settings.

  • On activation, require: select Microsoft Entra Conditional Access authentication context and select the Fido2 Authentication context we created before.
  • Optional: Shorten the Activation maximum duration and or configure Require justification on activation for the auditing and Require approval to activate to use the Four-eyes principle.
  • Click Update when finished to save the new settings

5. Add Assigments

To start using the role we need to assign it to an admin. Click Add assigments to add the role to an admin.

We now need to select either a user or a group that is eligible for this role.
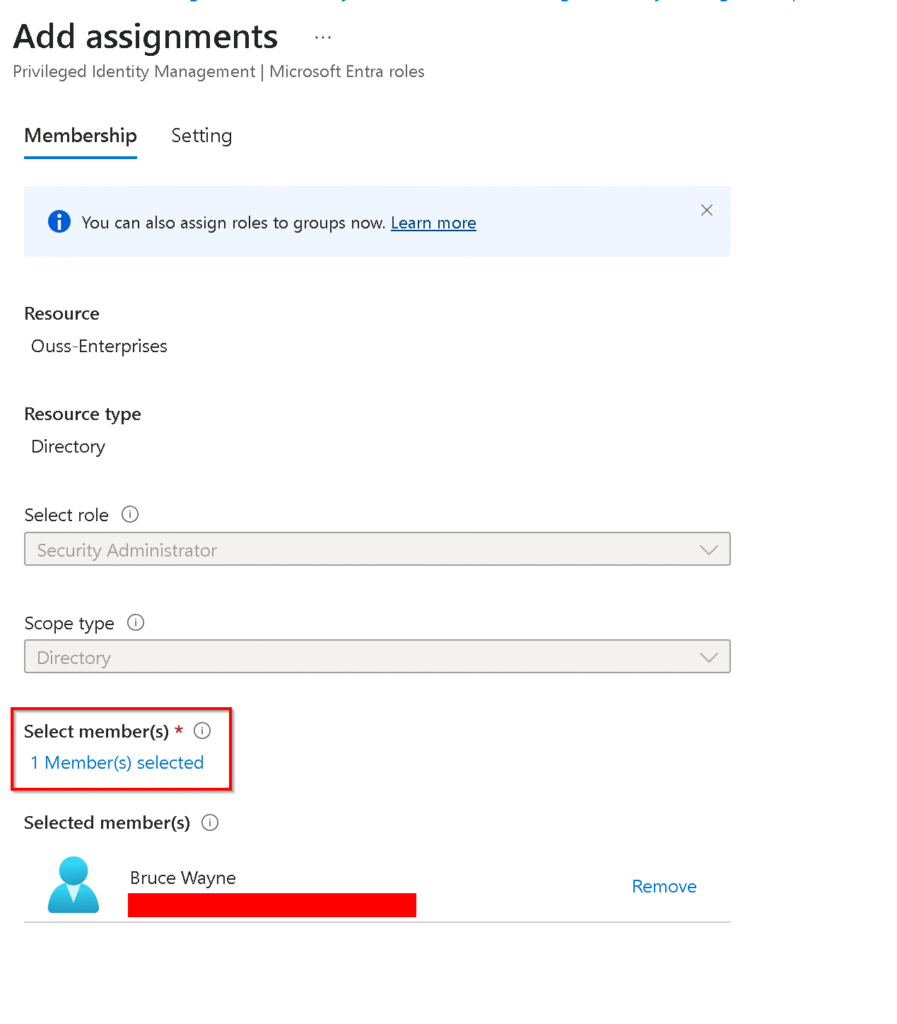
The next step is selecting if the assigment for role has a end date or not. We will skip that step and Click on Assign to finish the assigment.

Now we can see that the user has been granted the PIM role of Security Administrator and we have the option to update this assigment or remove it if needed.

The user will be notified by email that he has a new role that can be activated. The user can click on the View or activate role to activate the Security Administrator role.


6.How the PIM role works in practice

  1. Role Activation:
    When a user attempts to activate the Security Administrator role via PIM, they will be prompted to authenticate using a phishing-resistant MFA method, such as a FIDO2key.
  2. Authentication with FIDO2Key:
    The user inserts or taps their FIDO key and authenticates via a PIN or biometric option.
  3. Role Assignment:
    Once authenticated, the PIM system grants the user access to the Security Administrator role, subject to any additional approval requirements.

If this is the first time using the Fido2 key the user will need to pair the key like we previously showed here but we already did that step so this is what the admin sees:

and then the activation is finished successfully using the Fido2key requirement for the PIM activation.

Benefits of Requiring the FIDO2-Key for PIM Role Activation

  • Phishing-Resistant Security: FIDO2 keys eliminate the risk of credential phishing during privileged operations.
  • Granular Control: Conditional Access ensures that only users meeting specific criteria (e.g., FIDO2 key possession) can activate roles.
  • Audit and Compliance: Entra PIM maintains logs of role activations, providing traceability for compliance purposes.
  • User Convenience: Biometric or PIN-based authentication with FIDO keys provides a seamless user experience.

By combining PIM, Conditional Access, and FIDO2 keys, organizations can secure their most sensitive roles against unauthorized access while maintaining ease of use for administrators. Implementing this solution is a critical step toward a zero-trust security framework.


7. Bonus section part 1: Set up Temporary Access Pass (TAP) for onboarding

Why enable a Temporary Access Pass (TAP) first?

This step is crucial: you need MFA to register a FIDO2 key—but if the user doesn’t have any methods configured yet, you’ll be stuck.

To use a FIDO2 key, the user needs to satisfy MFA during the initial registration and that’s where TAP comes in. It acts as a time limited, strong authentication method that lets users onboard their FIDO2 key without needing a password or existing MFA. Think of it as a secure, one-time pass to get everything set up.

Here’s how to enable it:

1. Go to Microsoft Entra → Protection → Authentication methods → Temporary Access Pass

2. Enable the policy and assign it to the same user group as FIDO2

3. Issue a Temporary Access Pass to the user

You can do this under the user profile →
Authentication methods → Add Temporary Access Pass

4. Share the details with the user. After enabling it you will get the TAP details.

5. logon using the TAP details


This pass will allow the user to sign in securely to register their key, without needing any other MFA method.


8. Bonus section part 2: Testing the new sign in experience on a mobile device

You thought the fun was over? Not even close. Let’s really put this FIDO2 key to the test with some mobile action.

Yes, the key isn’t just for desktop sign-ins—it can also be used to log into Microsoft services like Microsoft Teams right from your mobile device. Whether you’re using the mobile browser or the Microsoft Teams app the FIDO2 key can do it all!

And now for the part I couldn’t wait to show you—this key has NFC. Yes, near field communication, the same magical tech that lets you pay for coffee with your phone. And we all know: everything is better with Bluetooth… (and NFC,) right? 😄

So how does this work on an iPhone, for example?

  1. Open Microsoft Teams login page.
  2. Enter your email and you will be prompted to use the Fido2-key..
  3. Choose the security key option and place the key at the NFC reader section on your phone and type in the pincode to login in.
  4. Boom—you’re in. No password. No codes. Just a tap-and-go experience (You can also use this method to satisfy MFA re-authentication if needed.)

This works for other apps that support modern auth too, not just Teams. The important part is: as long as the app or site supports WebAuthn (which Microsoft services do), you’re good to go.

This little key is surprisingly versatile and kind of fun to use.


9. Final thoughts

We’ve now completed the trilogy (Don’t we all love good trilogies? The Dark Knight we’re looking at you 🦇🦇🦇).

So to sum it up:

✅ FIDO2 sign-in enabled
✅ Passwordless login via Windows Hello for Business
✅ Secure, phishing-resistant privileged access using FIDO2 + PIM

This is the kind of security posture that’s not only modern and compliant—but also convenient for your users and sustainable for IT.

Ready to ditch passwords for good? You’re already well on your way.

Stay tuned for more on securing your digital workplace—and as always….until next time on Ouss in the Cloud.

Let me tell you something about FIDO2 key authentication Part 2

Welcome back to part two of our FIDO2 blog series! In part one, we explored how to enable FIDO2 key authentication in Microsoft Entra and how to register the key for a user. In this post, we’re diving into the next piece of the puzzle—configuring Windows Hello for Business (WHfB) in Intune to allow FIDO2 key sign-in.

This step is crucial if you want a consistent passwordless experience across your Windows devices, including desktops, laptops, and even mobile (yes, we’ll get to on part 3 of this series!).

Table of Contents:

  1. Introduction
  2. Prerequisites
  3. Enable Windows Hello for Business in Intune
  4. Enable Windows Passwordless Experience with an Intune device policy
  5. Testing the new sign in experience on a windows device
  6. Resetting the Fido Key
  7. Conclusion

1. Introduction

If you’re planning to roll out FIDO2 keys as a sign-in method, configuring Windows Hello for Business in Intune is essential (especially since this method is more tailored to corporate environments and not something an average user would typically set up in his environment).

Without this method , users can authenticate in browsers or mobile apps but not directly from the Windows lock screen.

Let’s fix that!

2. Prerequisites

Before we start, make sure you meet the following requirements:

Users need an Intune device configuration policy that enables Windows Hello for Business
Devices must run Windows 10 version 1903 or later, or Windows 11
Devices should be Azure AD joined (or Hybrid Azure AD joined)

3. Enable Windows Hello for Business in Intune

We want to enable FIDO2 key authentication across all Microsoft systems and for various scenarios. This will allow users to authenticate with the key on a webpage, mobile device, and of course, their personal computer.

Follow the steps below to enable this method within Windows Hello for Business:

  1. Open the Intune Admin Center and go to Devices.
  2. Select Enrollment from the menu.
  3. Choose Windows Hello for Business.
  4. Enable Windows Hello for Business by toggling it on (if it’s not enabled already).
  5. Scroll to the bottom and ensure Use security keys for sign-in is enabled.
  6. Click Save to apply the changes.

If it’s already enabled by your organization, you can skip this step.

4. Enable Windows Passwordless Experience with an Intune device policy

To ensure a full passwordless experience—including Windows Hello for Business sign-in at the lock screen—we also need to configure a policy in Intune.

This setting is needed to make passwordless sign-in work on the Windows lock screen using Windows Hello for Business. Without it, users can still sign in with a FIDO2 key in the browser or on mobile apps, but not directly on the device.

Below are some specific considerations for this part.

And this is how to create the policy in Intune:

Open a browser and go to the Microsoft Intune admin center and follow below steps:

  1. In the left-hand menu, go to Devices.
  2. Click on Configuration and then select
  3. Create to start a new policy.
  4. For Platform, select Windows 10 and later.
  5. For Profile type, choose Settings catalog.
  6. Click Create to continue.

Give the policy a name and continue

In the next page follow below steps:

  1. Click on + Add settings
  2. In the Settings picker, type “Use security key for sign-in”
  3. Select Windows Hello for Business
  4. Under Settings name, select Use security key for sign-in
  5. Set the option to Enabled

If you make use of scope tags or want to target a specific assignment group (for testing, for example), go ahead and select those. But in our case, we want all Autopilot devices to have this option enabled by default:

If everything looks good, press Next and then Create to enable and deploy the policy.

Once this policy is applied, users will be able to use FIDO2 keys right from the Windows sign-in screen—no password needed. So let’s go ahead and test it out.

5. Testing the new sign in experience on a windows device

In the previous blog, we walked through how to configure and register a FIDO2 key as an authentication method for your user account. If you haven’t done that yet, I recommend checking it out first.

Now that your our FIDO2 key is already set up, let’s test it out for a passwordless Windows sign-in:

Steps to Sign in with Your FIDO2 Key

  1. On the Windows lock screen, click Other user and click on Sign in options

2. You’ll now see a new option: Sign in with a security key. Insert your FIDO2 key into the USB port and click the option. (Since the key has already been configured, you’ll be prompted to enter your PIN code).

Enter the PIN code you created during setup and press Enter.

3. You will get asked to touch the key when the key’s green Y light flashes, touch the key to continue.

If everything went well you will see the famous Windows Hello logo:

🎉 Congratulations, you’ve just completed your first passwordless login on Windows using a FIDO2 key!

6. Resetting the Fido Key

If you want to change the PIN code or reset the Fido key entirely, download the YubiKey Manager. After the usual next, next, next, the program will launch. Click on Applications, select FIDO2, and choose either Change PIN or Reset FIDO2.

You’ll be prompted to touch the key to verify that it’s in your possession.


7. Conclusion

And that’s it! You’ve now successfully configured Windows Hello for Business to support FIDO2 keys and tested the full sign-in experience—from inserting the key to logging in without typing a password. This is a big step toward a truly passwordless future in your organization and for users to not have to change the password so many times as that’s really something of the past imo.

In the next part of this series, we’ll show you how to use the FIDO2 key for secure Privileged Identity Management (PIM) role activation. That one’s especially important for admins and high-privilege users, so make sure to stick around!

Until next time—stay secure and password-free! 🔐

Let me tell you something about FIDO2 key authentication Part 1

In today’s blog, we’re kicking off our series on FIDO2 key authentication by exploring how to set up FIDO2 hardware key sign-in for Microsoft services. This secure, phishing-resistant multi-factor authentication (MFA) solution not only boosts security but also simplifies the login experience.


Table of Contents:

  1. Introduction
  2. Enable the FIDO2 Authentication method in Microsoft Entra
  3. Add the sign-in method for the user
  4. Test the FIDO2 key method using web logon
  5. Conclusion

1.Introduction

In this day and age protecting access to corporate resources is more crucial than ever. FIDO2 keys offer a simpler, more secure alternative to password-based authentication, eliminating the need for frequent password changes.

In this blog, we’ll guide you through setting up FIDO2 key authentication in Microsoft 365 and show how users can securely access their data.

Because let’s be honest, who hates changing their passwords every month? I know I do!
With a FIDO2 key , we can finally move to a passwordless future and ditch the hassle of remembering and updating passwords.

2. Enable the FIDO2 Authentication method in Microsoft Entra

Prerequisites:

At least an "Authentication Policy Administrator" role
A Microsoft certified Security key (we use the FIDO2 NFC Yubi Key)
Entra joined computers (for Windows Hello for Business)


First things first, before users can take advantage of FIDO2 key authentication you need to enable it as a supported sign-in method in Microsoft Entra.
Follow these steps to get started:

Steps to Enable FIDO2 Key Authentication in Microsoft Entra

  1. Open a browser and go to the Microsoft Entra Admin Center.
  2. Login with an admin account that has at least the Authentication Policy Administrator role.
  3. In the search bar, type in “auth methods”
  4. Select the “auth methods” service

Configure the passkey method

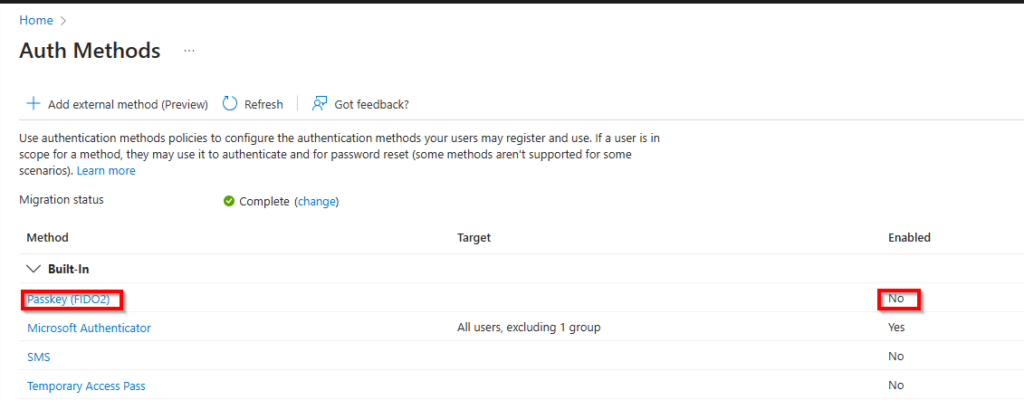
In the list of authentication methods, locate “Passkey (FIDO2)”.

As you can see, the method isn’t enabled yet and needs to be configured. Click on it to start the process.

I recommend starting with a test user group. Once you're confident everything is set up correctly, you can either keep the current group, switch to another group or enable this method for all users.

Now we need to configure the policy, follow:

  1. Enable the Policy
  2. Toggle the policy to Enabled.
  3. Select the Target
    Choose whether to apply the policy to all users or specific groups.
  4. Add Groups (If Applicable)
  5. If you selected the group option, click Add groups, choose your desired groups, and click Configure.

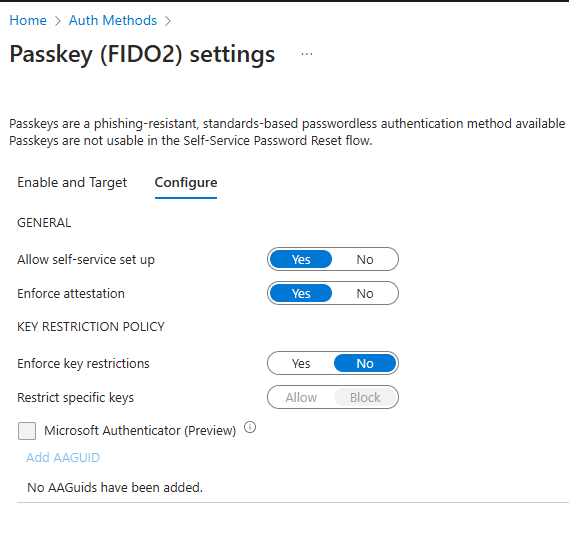
These are the settings I used for this scenario. If this is your first time setting up FIDO2 keys, I wouldn’t recommend enabling key restrictions just yet. There are tools available to identify the AAGUID on your FIDO2 keys, but let’s keep things simple for now.

Once you’ve configured the settings to your liking, click Save to enable the FIDO2 key authentication method.

As you can see, the policy is now enabled. This means you can now add this authentication method to a user, allowing them to start using the security key for authentication/passwordless sign-ins.

It can take between 5-45 minutes before the method is available to use. If it doesn't work right away don't panic, it will eventually be available to you. 


3.Add the sign-in method for the user

After enabling the FIDO2 authentication method and configuring the security key as a sign-in option for Windows Hello for Business (which we’ll cover in a future blog), the next step is to assign this method to a user who is a member of the FIDO2 Token Group we specified earlier.

Here are the steps to add the sign-in method to a user:

  1. Go to the My Sign-Ins Portal and add sign-in method
    • Navigate to My Sign-Ins.
    • Sign in with your Microsoft account.
    • Once signed in, click on “Add method” at the top of the page.
  2. Select Security Key as the Method
    • From the dropdown menu, select “Security key”.

3. Choose the Key Type

  • Select the type of security key you are using:
    • USB Device: For keys that connect via USB.
    • NFC Device: For keys that connect wirelessly using NFC.
  • Our key has both capabilities but we will choose USB device for now.

4. You’ll be prompted to insert the key into the USB port. Once the key is inserted, click Next to begin the pairing process.

You will now be redirected to a new page to set up the passkey.

5. Next, choose where you want to save the key. Select Security key and click Next.

6. You’ll see a couple of confirmation screens from Windows Security. Click OK twice to continue.

7. If you have a new key (and I assume you do), you’ll need to create a PIN for it. Enter a new pin code twice and click OK.

8. This is where the key truly excels. You’ll be prompted to touch the security key. The Y indicator will turn green, signaling that you need to touch it. This adds an extra layer of security, as only someone with physical access to the key can complete this step—making it hacker-proof.

FIDO2 key

We’re all set! You’ll be asked to give your FIDO2 key a name and to save it.

The authentication method has been successfully added and can now be used across all Microsoft services/

Your preferred authentication method has also been updated to FIDO2, as it offers a more secure option than the Microsoft Authenticator.

4.Test the FIDO2 key method using web logon

Below are the step to test the Fido2 key sign-in method on the Microsoft portal.

  1. Go to a Microsoft Portal page
  2. Select Sign-in options

3. Select the Security key option

4. Select Different Passkey if the system detects a previously saved key, such as a Windows Hello for Business key.

5. Select the security key option

6. If you’re prompted with other options instead of the key, select Use another device and choose Security key, then click Next.

FIDO2 key

7. Enter your security pin and touch the key to continue.

You’ve now successfully completed your first passwordless sign-in!

5. Conclusion

In conclusion, FIDO2 hardware key sign-in provides a secure, phishing-resistant authentication method while offering a passwordless login option. It enhances security and improves user experience by eliminating the need for complex passwords. Microsoft now recommends against password expiration, as users often forget them or write them down, which can undermine security.
This marks a shift from past practices where expired passwords were seen as more secure and you got extra security score point for it!

In the upcoming parts of this blog series, we’ll dive into configuring Windows Hello for Business to use FIDO2 keys, including how to sign in with this method on mobile devices. Additionally, we’ll explore how to use the FIDO2 key for secure Privileged Identity Management (PIM) role activation. Since this topic is quite detailed and long , we’ve divided it into a three-part series to provide a thorough understanding of each aspect. Stay tuned for part two and three!

Let me tell you something about Windows Laps and Intune

To my surprise, I haven’t written about Intune yet.
Given that my header promises content about Intune, it’s about time we dive into this topic!

Today’s blog will be about enhancing security and streamlining the management of local administrator passwords across your Windows devices by implementing LAPS with Intune.

In this article, we’ll walk you through the step-by-step process of setting up LAPS with Intune and explore the numerous benefits it can bring to your organization. Whether you’re looking to improve your security or simplify password management, this guide will provide you with everything you need to get started.

Table of Contents:

Prerequisites
Understanding LAPS and its Integration with Intune
Step-by-Step Guide
Step 1: Enable LAPS in Microsoft Entra
Step 2: Enable the local admin account
Step 3: Create the LAPS policy in Intune
Step 4: Test the solution
Troubleshooting
Final Thoughts

Prerequisites

Setting up Local Administrator Password Solution (LAPS) for your Intune tenant for the first time is straightforward, but it does come with specific requirements (I know because I didn’t meet them in my first test 😅).

To ensure Intune supports Windows LAPS in your environment, you’ll need to meet the following prerequisites:

Windows OS requirements:

License requirements:

Microsoft plan with at least:

  • Microsoft Entra ID
  • Intune Plan 1
Most companies have above licenses and the required Windows OS so it shouldn't be a problem for them to use LAPS.

Understanding LAPS and its Integration with Intune

Local Administrator Password Solution (LAPS) is a Microsoft tool designed to improve the security of local admin passwords on Windows devices. By generating unique passwords for each device and securely storing them on-premises (Active Directory) or in the Cloud (in Entra ID), LAPS addresses the security risks of shared, old and unsecure passwords (or passwords that never get changed even if staff changes happen the password are the same for many years!).

When combined with Microsoft Intune, LAPS provides a centralized way to manage these passwords, enhancing security and simplifying administrative tasks. Here are the key advantages of using LAPS with Intune:

  1. Centralized Oversight: Intune streamlines the management of admin passwords across all Windows devices from a single platform.
  2. Enhanced Security: Unique and complex passwords for each device reduce the chances of unauthorized access.
  3. Built-In Functionality: The latest Windows OS versions come with the LAPS agent, removing the need for additional installations.
  4. Operational Efficiency: Automating password updates frees up time and resources that would be spent on manual changes.
  5. Compliance and Monitoring: LAPS offers a detailed audit log of password changes, ensuring adherence to security policies and facilitating easy monitoring through Intune.

Using LAPS with Intune not only boosts your security framework but also simplifies the management of local admin passwords, making your IT processes more efficient and secure.

Step by step guide

In this section, we will walk you through the process of setting up LAPS with Intune. Follow these steps to ensure a smooth and successful implementation of Local Administrator Password Solution in your environment. Let’s get started!

Step 1: Enable LAPS in Microsoft Entra

The initial step is to activate the LAPS solution through the Microsoft Entra ID portal. Follow these steps to verify if LAPS is already enabled or to enable it:

After activating the LAPS solution, it’s important to enable the default built-in local admin account. Windows disables this account by default for security reasons, but we will use this account for the LAPS solution (You can use another account if you prefer).

Step 2: Enable the local admin account

We need to create a new device profile.
First Navigate to the Intune portal and go to Devices -> Configurations.
Press Create and select New policy. Select Windows 10 and later as the platform and pick the Settings catalog as the profile type.

Name your policy and press Next.

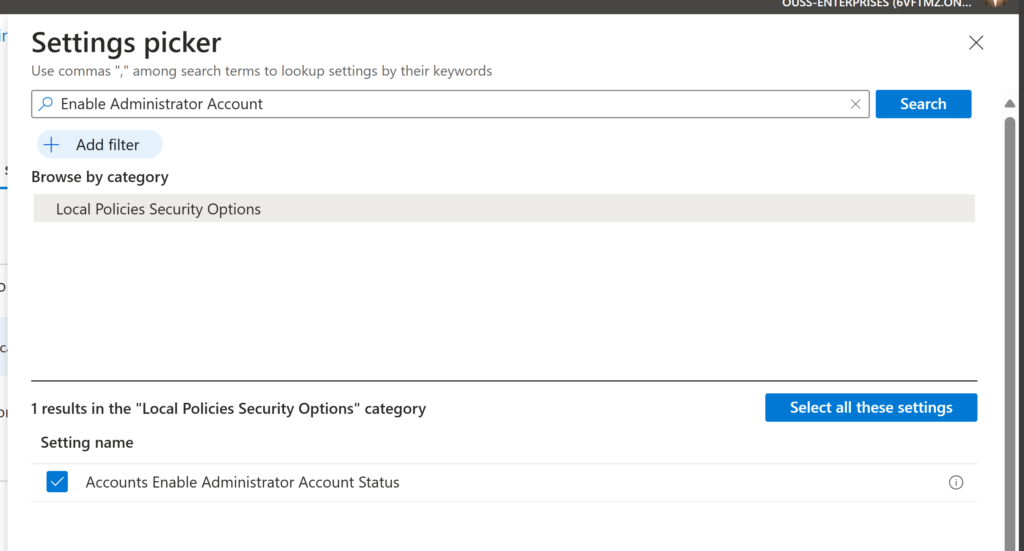
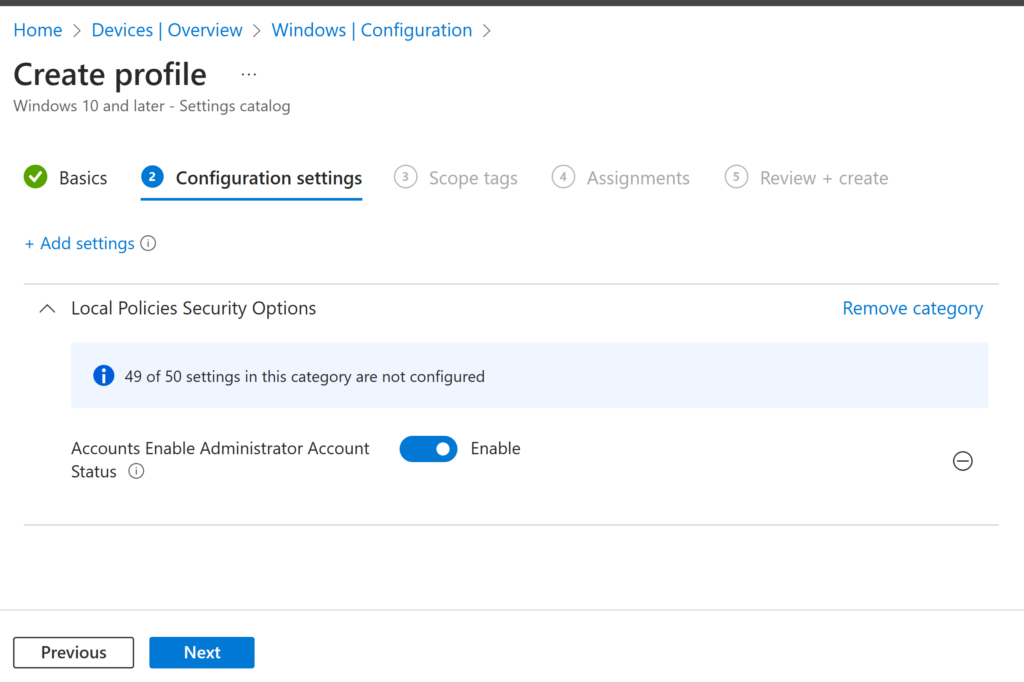
In the configuration settings page, click Add settings and select the policy.

Enable the policy and press next

Configure scope tags or special assignments if needed.
We opted to enable the policy on all devices, ensuring that the policy applies universally (We don’t recommend using user assignment!).

Review the policy and click Create.

Now that we have enabled the local admin account we need to create the LAPS policy.

Step 3: Create the LAPS policy in Intune

In this step, we will create the LAPS policy in Intune and push it to all devices.

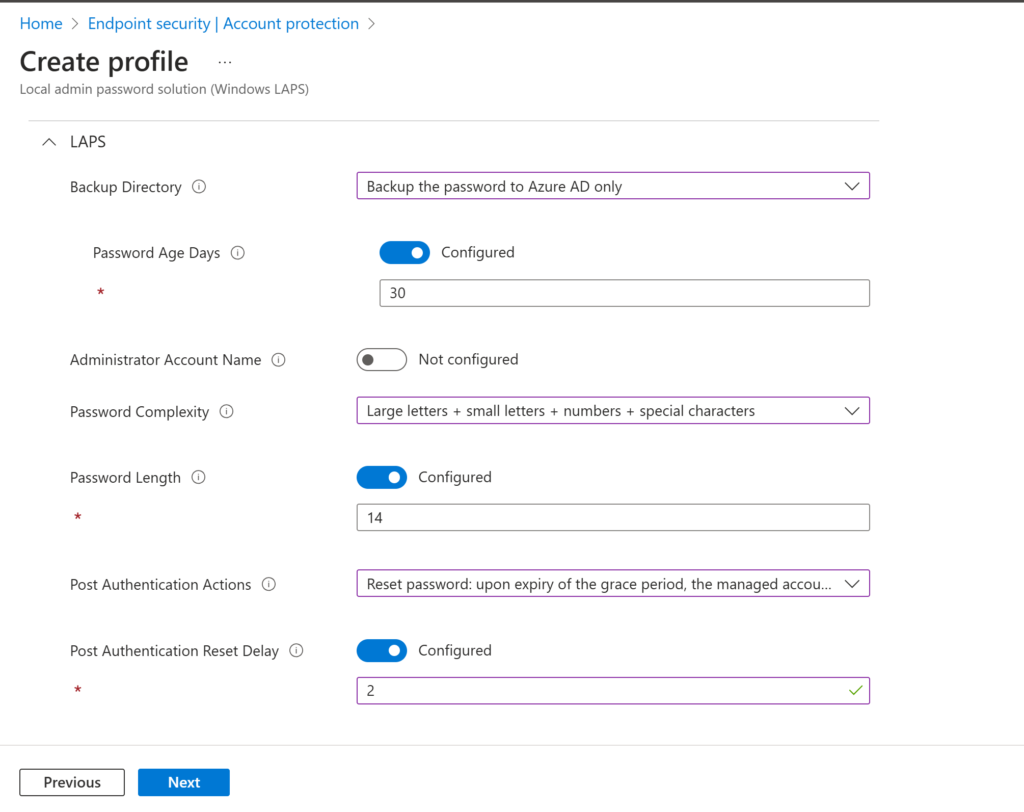
From the Intune Portal, go to Endpoint security -> Account protection. Click Create Policy and select Windows 10 or later and Local admin password solution (LAPS).

Give your profile a name and click Next. Configure the settings you want to apply.. Below are the settings we configured:

If needed, configure scope tags or special assignments. We want to enable this policy on all devices so select All Devices (If you want to exclude devices you can configure that on this step as well).

Review the settings and click Create.

After a few hours, the devices will pick up this setting.
To speed up the process, you can manually sync the device:

or bulk sync multiple devices.

Step 4: Test the solution

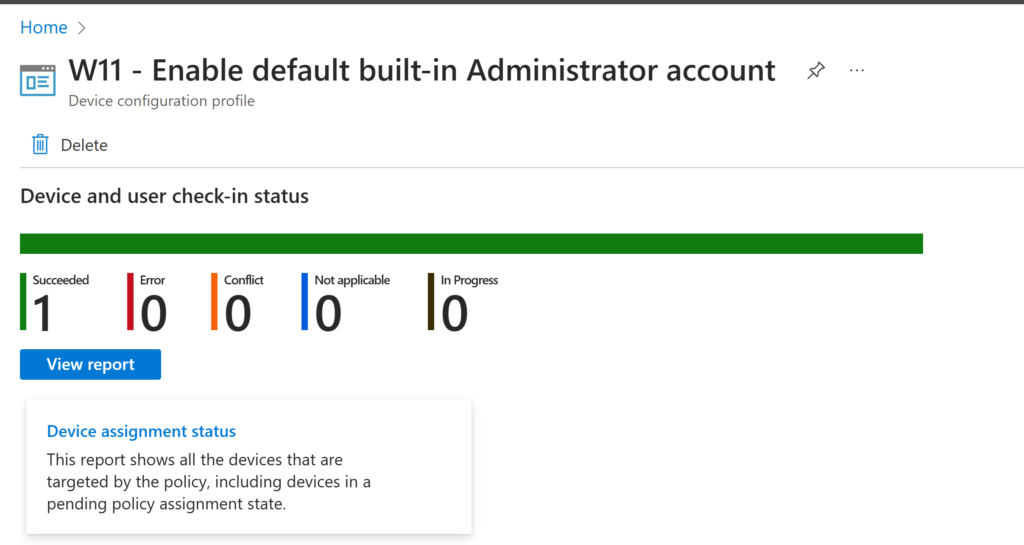
After waiting for a little bit you could check if the policy have been applied to your device by checking the overview page of the created LAPS policies:

As you can see the policies have been applied successfully. We will now test the laps solution to see if it works.

Go to the Intune portal and select the device you want to test with. Click Local admin password -> Show local admin password and Copy or view the password from there.

Use the LAPS-generated password to start a process that requires administrator credentials.

If you can open the elevated command prompt succesfully, the LAPS solution has been implemented correctly!

If the solution doesn’t seem to apply or work, check the following part.

Troubleshooting

If you’re experiencing delays in the policy applying, you might want to check the following on the device:

Registry

Verify that there is a new registry entry for LAPS with the applied settings. If the entry is missing, LAPS might not be functioning correctly, and you may need to update the OS. (This was the case for me with an outdated VM🙄). The oath should be:

HKEY_LOCAL_MACHINE\SOFTWARE\Microsoft\Policies\LAPS

Event viewer

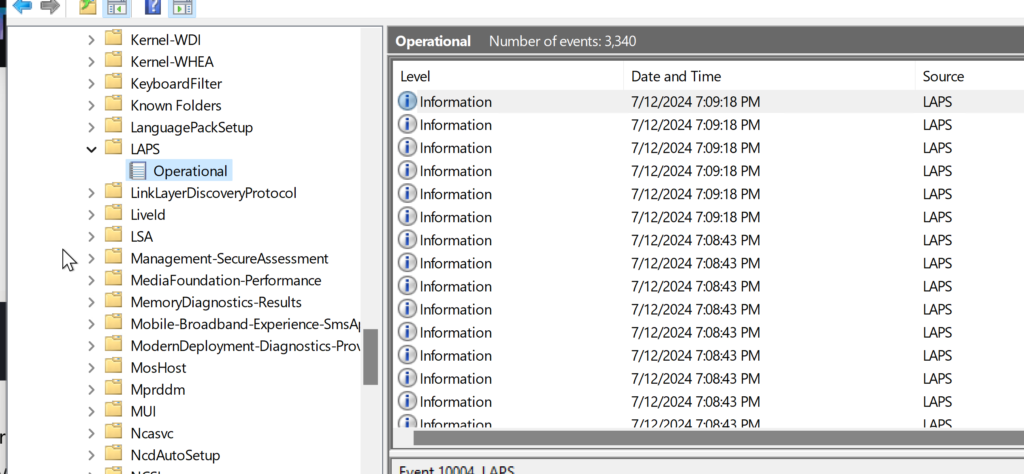
You can also check the Event Viewer for any issues. Look for a new LAPS folder created under the following path:

Application and Services Logs -> Microsoft-Windows-LAPS/Operational

Final Thoughts

Implementing LAPS with Intune boosts your security by automating local admin password management and fixing issues like outdated or unsafe practices.
This makes your admin tasks easier and keeps your IT environment compliant and efficient.

I hope you enjoyed this in-depth and technical blog post. I aim to balance content for various audiences, so you’ll see a mix of detailed guides and practical tips. Your feedback helps me fine-tune this balance, so feel free to share your thoughts!

Untill next time 💪