Writes about Microsoft 365, Intune, Purview, SharePoint, Teams, Defender and more

Year: 2024

Let me tell you something about FIDO2 key authentication Part 1

In today’s blog, we’re kicking off our series on FIDO2 key authentication by exploring how to set up FIDO2 hardware key sign-in for Microsoft services. This secure, phishing-resistant multi-factor authentication (MFA) solution not only boosts security but also simplifies the login experience.


Table of Contents:

  1. Introduction
  2. Enable the FIDO2 Authentication method in Microsoft Entra
  3. Add the sign-in method for the user
  4. Test the FIDO2 key method using web logon
  5. Conclusion

1.Introduction

In this day and age protecting access to corporate resources is more crucial than ever. FIDO2 keys offer a simpler, more secure alternative to password-based authentication, eliminating the need for frequent password changes.

In this blog, we’ll guide you through setting up FIDO2 key authentication in Microsoft 365 and show how users can securely access their data.

Because let’s be honest, who hates changing their passwords every month? I know I do!
With a FIDO2 key , we can finally move to a passwordless future and ditch the hassle of remembering and updating passwords.

2. Enable the FIDO2 Authentication method in Microsoft Entra

Prerequisites:

At least an "Authentication Policy Administrator" role
A Microsoft certified Security key (we use the FIDO2 NFC Yubi Key)
Entra joined computers (for Windows Hello for Business)


First things first, before users can take advantage of FIDO2 key authentication you need to enable it as a supported sign-in method in Microsoft Entra.
Follow these steps to get started:

Steps to Enable FIDO2 Key Authentication in Microsoft Entra

  1. Open a browser and go to the Microsoft Entra Admin Center.
  2. Login with an admin account that has at least the Authentication Policy Administrator role.
  3. In the search bar, type in “auth methods”
  4. Select the “auth methods” service

Configure the passkey method

In the list of authentication methods, locate “Passkey (FIDO2)”.
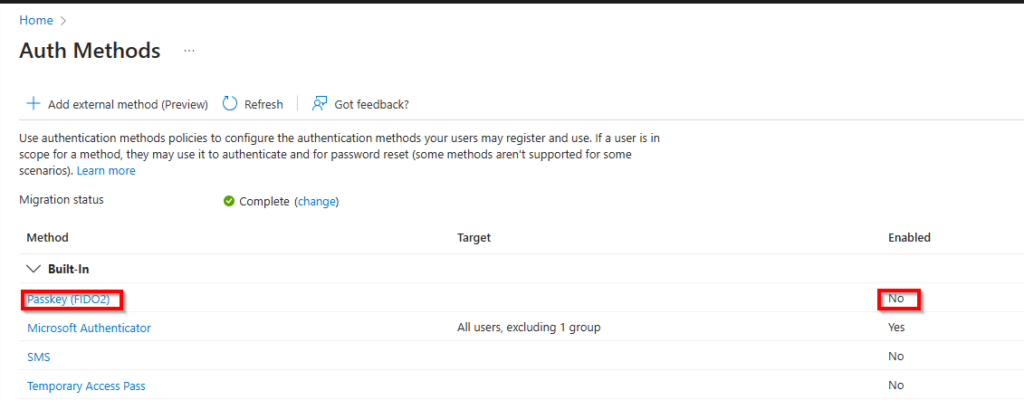
As you can see, the method isn’t enabled yet and needs to be configured. Click on it to start the process.

I recommend starting with a test user group. Once you're confident everything is set up correctly, you can either keep the current group, switch to another group or enable this method for all users.

Now we need to configure the policy, follow:

  1. Enable the Policy
  2. Toggle the policy to Enabled.
  3. Select the Target
    Choose whether to apply the policy to all users or specific groups.
  4. Add Groups (If Applicable)
  5. If you selected the group option, click Add groups, choose your desired groups, and click Configure.
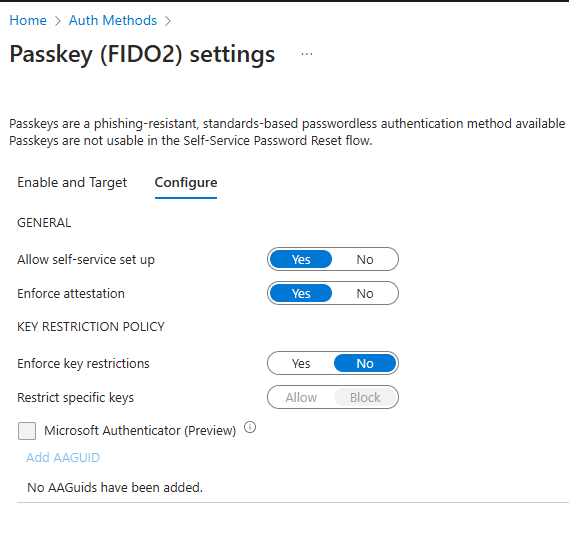
These are the settings I used for this scenario. If this is your first time setting up FIDO2 keys, I wouldn’t recommend enabling key restrictions just yet. There are tools available to identify the AAGUID on your FIDO2 keys, but let’s keep things simple for now.

Once you’ve configured the settings to your liking, click Save to enable the FIDO2 key authentication method.

As you can see, the policy is now enabled. This means you can now add this authentication method to a user, allowing them to start using the security key for authentication/passwordless sign-ins.

It can take between 5-45 minutes before the method is available to use. If it doesn't work right away don't panic, it will eventually be available to you. 


3.Add the sign-in method for the user

After enabling the FIDO2 authentication method and configuring the security key as a sign-in option for Windows Hello for Business (which we’ll cover in a future blog), the next step is to assign this method to a user who is a member of the FIDO2 Token Group we specified earlier.

Here are the steps to add the sign-in method to a user:

  1. Go to the My Sign-Ins Portal and add sign-in method
    • Navigate to My Sign-Ins.
    • Sign in with your Microsoft account.
    • Once signed in, click on “Add method” at the top of the page.
  2. Select Security Key as the Method
    • From the dropdown menu, select “Security key”.

3. Choose the Key Type

  • Select the type of security key you are using:
    • USB Device: For keys that connect via USB.
    • NFC Device: For keys that connect wirelessly using NFC.
  • Our key has both capabilities but we will choose USB device for now.

4. You’ll be prompted to insert the key into the USB port. Once the key is inserted, click Next to begin the pairing process.

You will now be redirected to a new page to set up the passkey.

5. Next, choose where you want to save the key. Select Security key and click Next.
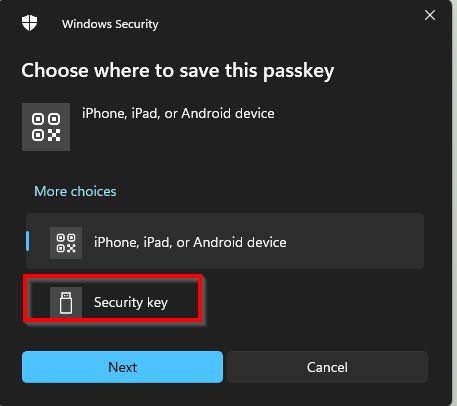
6. You’ll see a couple of confirmation screens from Windows Security. Click OK twice to continue.

7. If you have a new key (and I assume you do), you’ll need to create a PIN for it. Enter a new pin code twice and click OK.

8. This is where the key truly excels. You’ll be prompted to touch the security key. The Y indicator will turn green, signaling that you need to touch it. This adds an extra layer of security, as only someone with physical access to the key can complete this step—making it hacker-proof.

FIDO2 key

We’re all set! You’ll be asked to give your FIDO2 key a name and to save it.

The authentication method has been successfully added and can now be used across all Microsoft services/

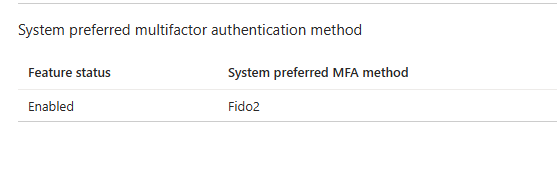
Your preferred authentication method has also been updated to FIDO2, as it offers a more secure option than the Microsoft Authenticator.
4.Test the FIDO2 key method using web logon

Below are the step to test the Fido2 key sign-in method on the Microsoft portal.

  1. Go to a Microsoft Portal page
  2. Select Sign-in options

3. Select the Security key option

4. Select Different Passkey if the system detects a previously saved key, such as a Windows Hello for Business key.

5. Select the security key option

6. If you’re prompted with other options instead of the key, select Use another device and choose Security key, then click Next.

FIDO2 key

7. Enter your security pin and touch the key to continue.

You’ve now successfully completed your first passwordless sign-in!

5. Conclusion

In conclusion, FIDO2 hardware key sign-in provides a secure, phishing-resistant authentication method while offering a passwordless login option. It enhances security and improves user experience by eliminating the need for complex passwords. Microsoft now recommends against password expiration, as users often forget them or write them down, which can undermine security.
This marks a shift from past practices where expired passwords were seen as more secure and you got extra security score point for it!

In the upcoming parts of this blog series, we’ll dive into configuring Windows Hello for Business to use FIDO2 keys, including how to sign in with this method on mobile devices. Additionally, we’ll explore how to use the FIDO2 key for secure Privileged Identity Management (PIM) role activation. Since this topic is quite detailed and long , we’ve divided it into a three-part series to provide a thorough understanding of each aspect. Stay tuned for part two and three!

Let me tell you something about Multiple MS Teams links in Outlook

Today’s blog will focus on troubleshooting an issue many of us have probably encountered : multiple/wrong Teams links in an Outlook meeting.

Introduction

Many users schedule meetings from an email thread containing multiple messages. While this method can be convenient, it often results in older Teams links remaining in the conversation, leading to potential issues. These lingering links can create broken or incorrect connections, causing users to accidentally join the wrong meetings when clicking on the “Join Teams Meeting” button.

In this article, we’ll examine the reasons behind these problems and offer practical solutions to help you avoid link confusion, ensuring your Teams meetings proceed without a hitch.

Table of Contents:

Introduction
Understanding the issue
How those links get created
The solution
Final Thoughts

Understanding the issue with multiple links in an Outlook meeting

When scheduling meetings in Outlook, especially within email threads that contain multiple emails, users often encounter issues with multiple Teams links. Each reply or forwarded email may contain older meeting links, which can lead to confusion. When a new meeting is created, the “Join Teams Meeting” button may still point to these outdated links instead of the newly generated one.

This can result in participants being directed to the wrong meeting or facing technical difficulties when trying to join. Furthermore, the presence of multiple links in the same email thread can make it challenging for users to identify the correct link quickly, especially if the subject matter of the meetings is similar. Understanding this issue is crucial for maintaining seamless communication and ensuring that all participants join the intended meeting without complications.

By addressing these concerns, organizations can enhance their meeting management process and reduce the likelihood of disruptions caused by faulty links.

Having an email thread included in the meeting invite can be incredibly useful, as it allows participants to review the context and purpose of the meeting. This is particularly beneficial for meetings scheduled in the future, serving as a helpful reminder of what was discussed and why the meeting is important. Additionally, you can include attachments in the meeting invite by selecting the email thread that contains the file(s) you want to add. Users often find it convenient to open the email thread and then click the button below to create a Microsoft Teams meeting link, ensuring that all relevant information is easily accessible for everyone involved.

Here’s how you can create a Microsoft Teams meeting from an email thread: open the email you want to use, and then click the button below:

As you can see, the email is converted into a meeting invite, allowing us to invite attendees just as we normally would.

The problem occurs when this process is repeated multiple times, or when users copy and paste meeting links into the email thread or invite. This can create issues that users may not even realize have occurred or know how to resolve.

Below, you’ll find the solution to address these challenges.

The solution: remove all Microsoft Teams links from the meeting invite

Outlook detects when an invite contains a Microsoft Teams link, enabling buttons like “Join this meeting.

However, it disables certain buttons we need, such as the “Don’t host online” button, which appears greyed out and cannot be added selected in the Teams meeting ribbon.

To resolve this issue, we need to create a new group in the ribbon and add the “Don’t host online” button. Right click on the ribbon and select “Change Ribbon.

In the classic ribbon section, select the option for “New Group” to create a custom group for your buttons.

Right-click on the new group and select “Change Name.” Choose a name that is easy to remember, as this will help you identify the group quickly in the future

To add the button you’re looking for, select “All Commands” from the list on the left-hand side and search for the desired button

Select the button and click “Add” to include it in the newly created ribbon group.

If the button is added successfully, click “OK” to close this window.

We now have a new button that is always available to help us when dealing with invites containing multiple Microsoft Teams links. By pressing this button, any existing links will be removed, allowing us to create a new meeting link without any issues.

We can now proceed to create a new meeting and knowing that it won’t contain multiple Microsoft Teams links.

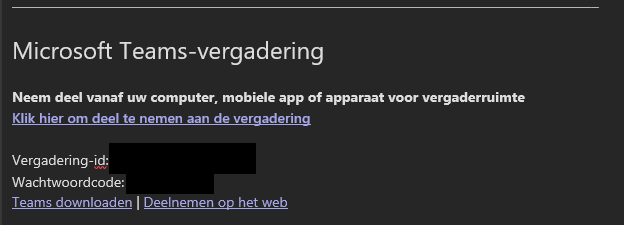
The links are displayed above in the invite and include all the relevant meeting information.

Final Thoughts

Microsoft Teams is, in my opinion, the best collaboration and communication tool there is, and creating invites within Outlook is essential these days. By addressing the challenges of multiple links in email threads and implementing the solutions discussed in this blog, you can eliminate those small, irritating issues that we could do without.

Adding a dedicated button to remove outdated links helps resolve the issue and prevents confusion among participants. By implementing this workaround, you can ensure that participants always join the correct meeting.

This is the end of the blog.
Thank you for reading, and until next time on Ouss in the Cloud…. (for those who know🫡).

Let me tell you something about Windows Laps and Intune

To my surprise, I haven’t written about Intune yet.
Given that my header promises content about Intune, it’s about time we dive into this topic!

Today’s blog will be about enhancing security and streamlining the management of local administrator passwords across your Windows devices by implementing LAPS with Intune.

In this article, we’ll walk you through the step-by-step process of setting up LAPS with Intune and explore the numerous benefits it can bring to your organization. Whether you’re looking to improve your security or simplify password management, this guide will provide you with everything you need to get started.

Table of Contents:

Prerequisites
Understanding LAPS and its Integration with Intune
Step-by-Step Guide
Step 1: Enable LAPS in Microsoft Entra
Step 2: Enable the local admin account
Step 3: Create the LAPS policy in Intune
Step 4: Test the solution
Troubleshooting
Final Thoughts

Prerequisites

Setting up Local Administrator Password Solution (LAPS) for your Intune tenant for the first time is straightforward, but it does come with specific requirements (I know because I didn’t meet them in my first test 😅).

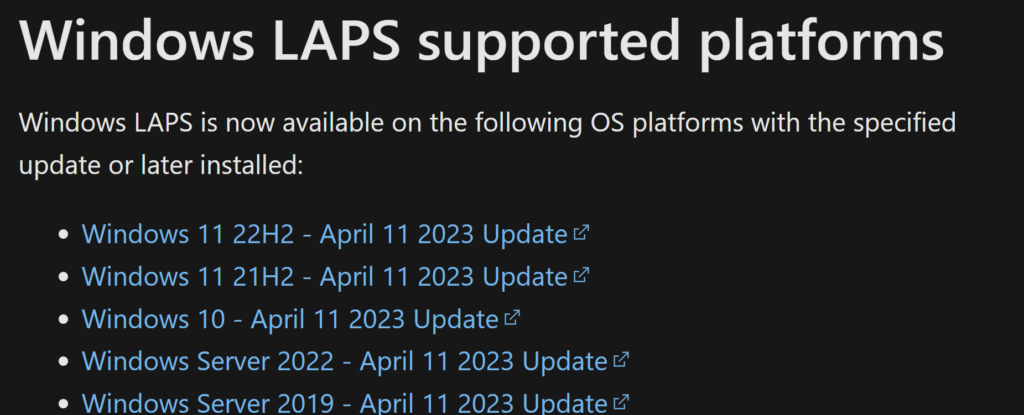
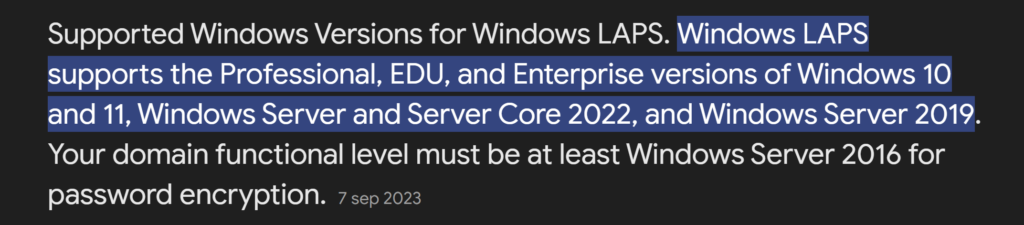
To ensure Intune supports Windows LAPS in your environment, you’ll need to meet the following prerequisites:

Windows OS requirements:

License requirements:

Microsoft plan with at least:

  • Microsoft Entra ID
  • Intune Plan 1
Most companies have above licenses and the required Windows OS so it shouldn't be a problem for them to use LAPS.

Understanding LAPS and its Integration with Intune

Local Administrator Password Solution (LAPS) is a Microsoft tool designed to improve the security of local admin passwords on Windows devices. By generating unique passwords for each device and securely storing them on-premises (Active Directory) or in the Cloud (in Entra ID), LAPS addresses the security risks of shared, old and unsecure passwords (or passwords that never get changed even if staff changes happen the password are the same for many years!).

When combined with Microsoft Intune, LAPS provides a centralized way to manage these passwords, enhancing security and simplifying administrative tasks. Here are the key advantages of using LAPS with Intune:

  1. Centralized Oversight: Intune streamlines the management of admin passwords across all Windows devices from a single platform.
  2. Enhanced Security: Unique and complex passwords for each device reduce the chances of unauthorized access.
  3. Built-In Functionality: The latest Windows OS versions come with the LAPS agent, removing the need for additional installations.
  4. Operational Efficiency: Automating password updates frees up time and resources that would be spent on manual changes.
  5. Compliance and Monitoring: LAPS offers a detailed audit log of password changes, ensuring adherence to security policies and facilitating easy monitoring through Intune.

Using LAPS with Intune not only boosts your security framework but also simplifies the management of local admin passwords, making your IT processes more efficient and secure.

Step by step guide

In this section, we will walk you through the process of setting up LAPS with Intune. Follow these steps to ensure a smooth and successful implementation of Local Administrator Password Solution in your environment. Let’s get started!

Step 1: Enable LAPS in Microsoft Entra

The initial step is to activate the LAPS solution through the Microsoft Entra ID portal. Follow these steps to verify if LAPS is already enabled or to enable it:

After activating the LAPS solution, it’s important to enable the default built-in local admin account. Windows disables this account by default for security reasons, but we will use this account for the LAPS solution (You can use another account if you prefer).

Step 2: Enable the local admin account

We need to create a new device profile.
First Navigate to the Intune portal and go to Devices -> Configurations.
Press Create and select New policy. Select Windows 10 and later as the platform and pick the Settings catalog as the profile type.

Name your policy and press Next.

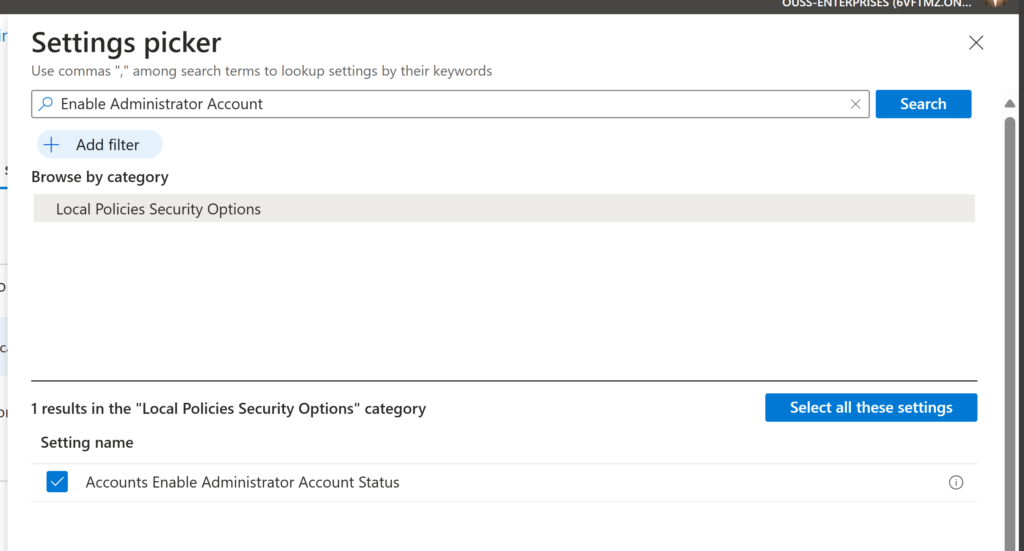
In the configuration settings page, click Add settings and select the policy.

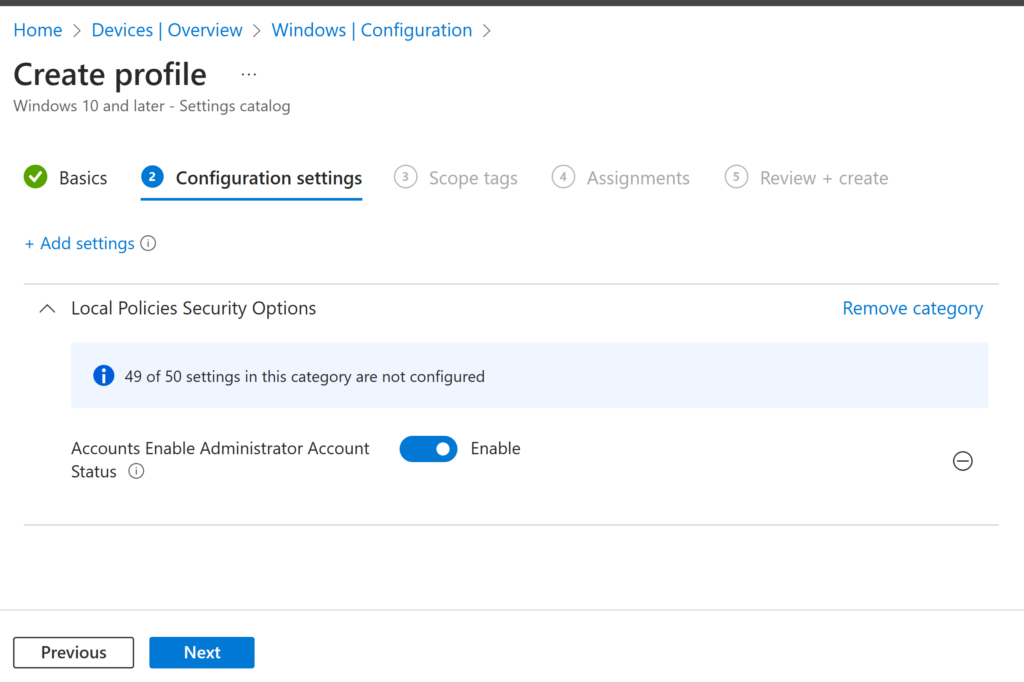
Enable the policy and press next

Configure scope tags or special assignments if needed.
We opted to enable the policy on all devices, ensuring that the policy applies universally (We don’t recommend using user assignment!).

Review the policy and click Create.

Now that we have enabled the local admin account we need to create the LAPS policy.

Step 3: Create the LAPS policy in Intune

In this step, we will create the LAPS policy in Intune and push it to all devices.

From the Intune Portal, go to Endpoint security -> Account protection. Click Create Policy and select Windows 10 or later and Local admin password solution (LAPS).

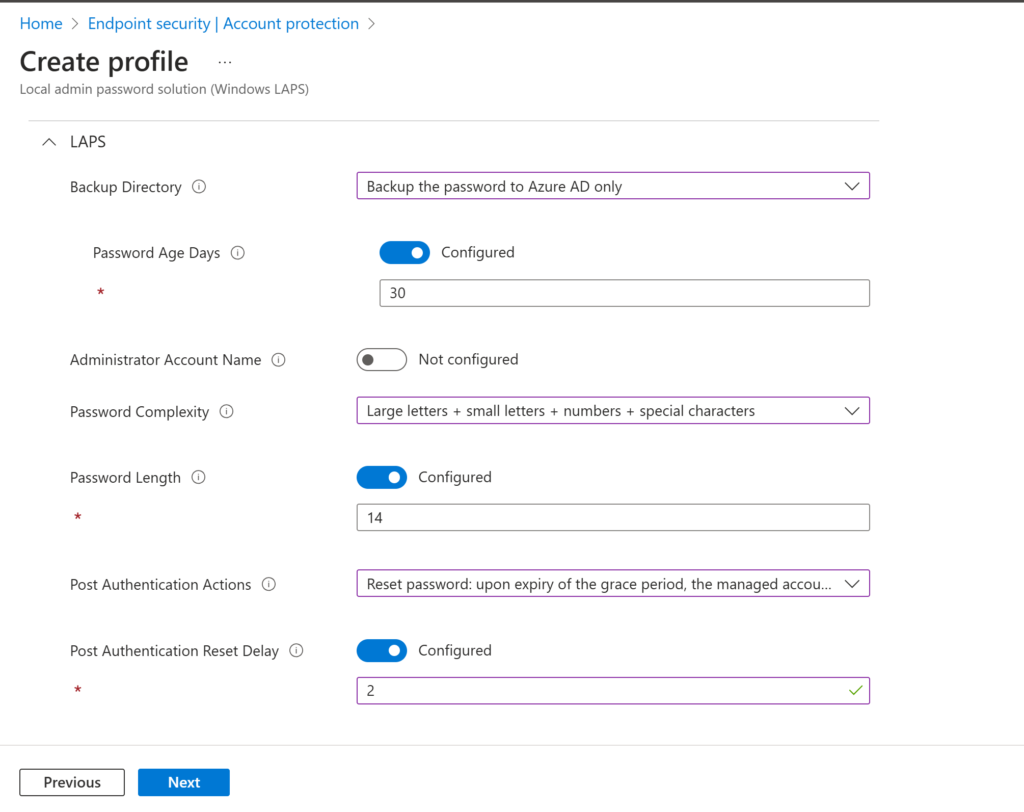
Give your profile a name and click Next. Configure the settings you want to apply.. Below are the settings we configured:

If needed, configure scope tags or special assignments. We want to enable this policy on all devices so select All Devices (If you want to exclude devices you can configure that on this step as well).

Review the settings and click Create.

After a few hours, the devices will pick up this setting.
To speed up the process, you can manually sync the device:

or bulk sync multiple devices.

Step 4: Test the solution

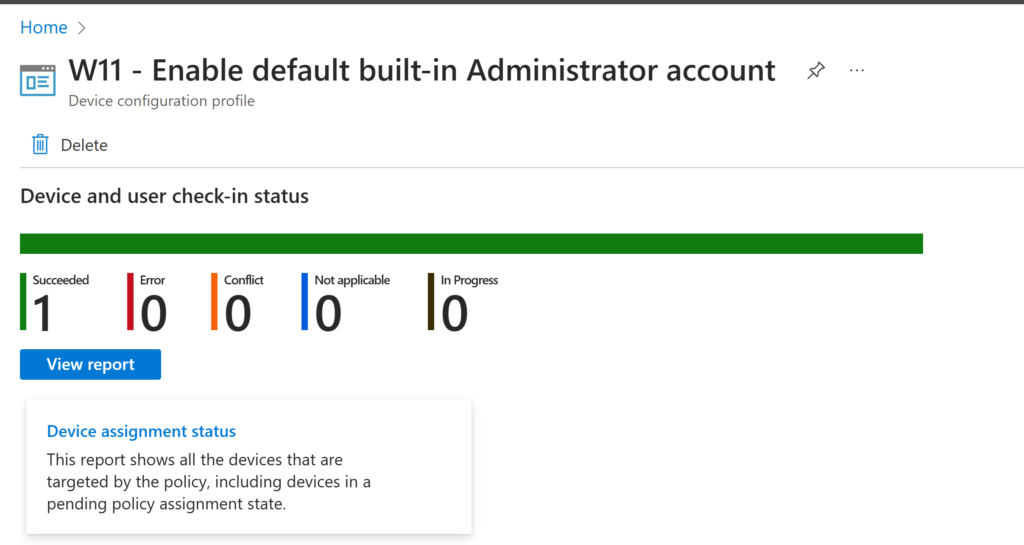
After waiting for a little bit you could check if the policy have been applied to your device by checking the overview page of the created LAPS policies:

As you can see the policies have been applied successfully. We will now test the laps solution to see if it works.

Go to the Intune portal and select the device you want to test with. Click Local admin password -> Show local admin password and Copy or view the password from there.

Use the LAPS-generated password to start a process that requires administrator credentials.

If you can open the elevated command prompt succesfully, the LAPS solution has been implemented correctly!

If the solution doesn’t seem to apply or work, check the following part.

Troubleshooting

If you’re experiencing delays in the policy applying, you might want to check the following on the device:

Registry

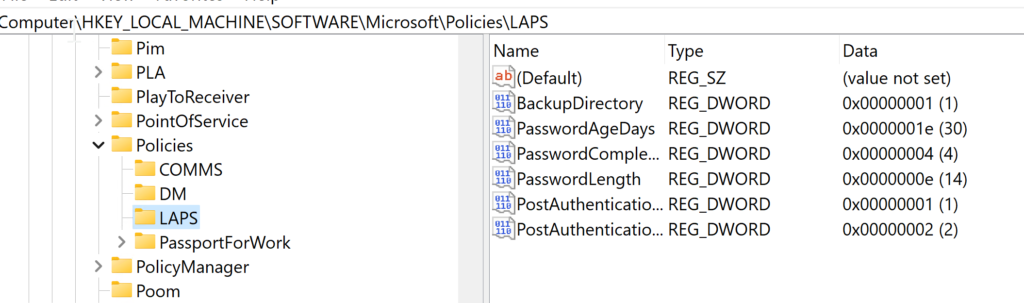
Verify that there is a new registry entry for LAPS with the applied settings. If the entry is missing, LAPS might not be functioning correctly, and you may need to update the OS. (This was the case for me with an outdated VM🙄). The oath should be:

HKEY_LOCAL_MACHINE\SOFTWARE\Microsoft\Policies\LAPS

Event viewer

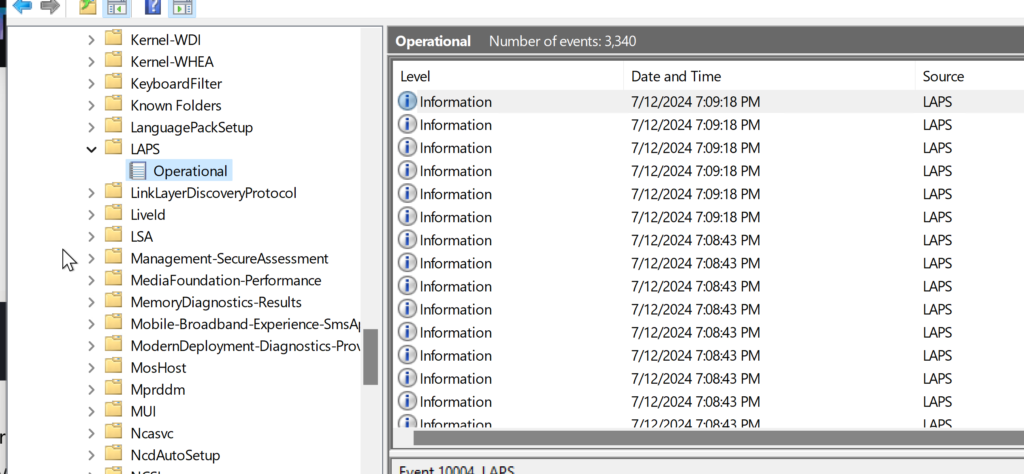
You can also check the Event Viewer for any issues. Look for a new LAPS folder created under the following path:

Application and Services Logs -> Microsoft-Windows-LAPS/Operational

Final Thoughts

Implementing LAPS with Intune boosts your security by automating local admin password management and fixing issues like outdated or unsafe practices.
This makes your admin tasks easier and keeps your IT environment compliant and efficient.

I hope you enjoyed this in-depth and technical blog post. I aim to balance content for various audiences, so you’ll see a mix of detailed guides and practical tips. Your feedback helps me fine-tune this balance, so feel free to share your thoughts!

Untill next time 💪

Let me tell you something about recording and editing videos

Today’s blog is going to be short but incredibly useful for many people. I’ll be showing you how to record and edit videos without spending a dime, using free tools that are just as effective as some of the expensive software out there. Whether you’re recording instructional content, editing your footage, or just want to enhance your projects with videos, these tips will help you achieve professional results without breaking the bank.

Introduction

if you are recording a lot of instructional content and want to enhance it with videos, you might think you need expensive software. However, I will show you how to record and edit videos for free.

Explore the different sections of this blog:

Recording the video

The trick is to use Microsoft PowerPoint. Surprised? Yes, you can use PowerPoint to capture videos.

Here are the steps to capture a video:

  • Open PowerPoint
  • Select “Record” and choose the type of capture you want to use (I usually use the screen recording option).
  • Record the content you want. You can also record audio and the mouse pointer if you like.
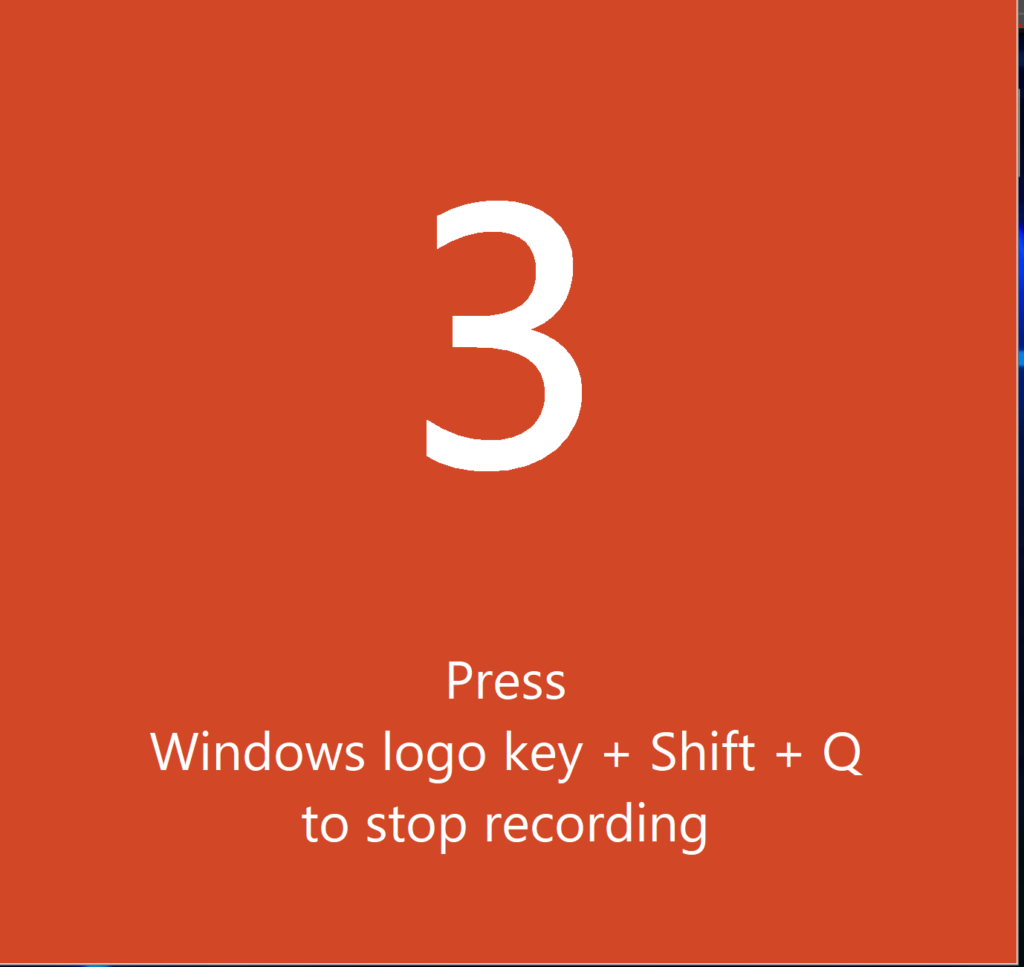
  • A countdown starts and lets you know how to stop the recording.
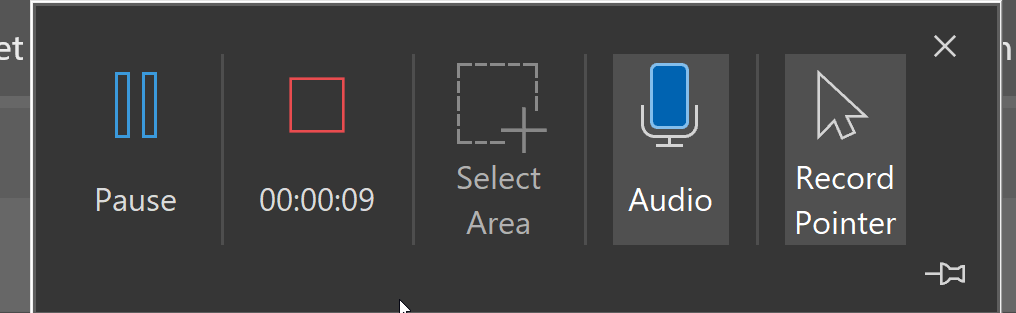
  • When you are done recording, press Windows logo + Shift + Q or hover to the top middle of the screen to stop or pause the recording.
  • You can either use the recording in a PowerPoint slide or save it as a media file to use elsewhere.
  • To save the capture, right-click on the recording and choose “Save Media As”.

Editing the video

After exporting the video, you can use it directly or enhance it further. Windows has a tool called “Microsoft Clipchamp” that makes video editing easy with little effort. Follow these steps to create great videos:

  • Open Clipchamp
  • Choose to make the video yourself or let AI assist you.

  • Import the video you want to use by clicking on “Import Media” and then “Browse Files”.
  • Once the video is imported, drag and drop it into the timeline to start editing.
  • After the video is loaded, you can start editing it to your liking.

Conclusion

This is the end of my blog. In the future, I might write a blog about Clipchamp and how to use it for recording and editing, but that’s for another day.

I aim to vary my posts between technical and practical topics, so the next blog may be a bit more technical than this one. 👌

Let me tell you something about solving Video Sharing Challenges

Today’s blog addresses a common issue many users face during meetings: video sharing in Microsoft Teams. I’ll guide you through the steps to overcome this problem and ensure smooth, efficient video sharing in your virtual meetings.

Introduction

Sharing videos during meetings can be a frustrating experience. Whether you’re in a standup, demo, or any other meeting via Microsoft Teams, you’ve likely encountered issues when trying to showcase a video. The common problem with screen sharing is that video and audio streams are not synchronized properly, causing the video to stutter and the audio to lag.

This issue can impact your presentation and make it difficult to convey the message you want to share. While sharing a link to a SharePoint location can work as a workaround, it lacks the engagement of a live presentation.

Explore the different sections of this blog:

1. Introduction
2. The Challenge
3. The Solution
4. Conclusion

The Challenge

Currently, Microsoft Teams doesn’t support direct video file sharing during meetings. When you try to share a video directly this is the error you encounter:

This limitation can be quite frustrating, especially when you want to ensure a smooth and professional presentation.

The Solution: PowerPoint Live

After experimenting with various methods, I found a reliable workaround using Microsoft PowerPoint Live. This feature allows you to share videos seamlessly in high quality, even with large audiences. Here’s a step-by-step guide to help you achieve this.

  1. Create a PowerPoint Presentation:
  • Start by creating a new PowerPoint presentation with just one slide. This will make it easier to manage and upload.
  • If your video file is large, consider compressing it using online tools to ensure smooth playback. Alternatively, you can download and use a YouTube video as an MP4 file.


2. Import the Video:

  • Insert the video into the slide.
  • Stretch the video to fill the entire slide, ensuring that it is easily viewable.

3. Save and Test:

  • Save your PowerPoint file.
  • Start a meeting in Microsoft Teams and click the share button.
  • Locate your PowerPoint file and double-click it to start PowerPoint Live.

4. Play the Video:

  • Once PowerPoint Live is running, simply press play to start the video.
  • Use the three dots menu to explore additional options that might enhance your presentation.

Conclusion

This method has been tested successfully in meetings with up to 250 participants, providing excellent video and audio quality, even on mobile devices!

By using PowerPoint Live, you can overcome the limitations of Microsoft Teams’ native (lack of) video sharing capabilities and deliver a smooth and a professional presentation. I hope this trick proves useful for your future meetings!

Stay tuned for more tips and tricks in future blogs.

Let me tell you something about Teams delegate scheduling errors

I recently navigated through this process and want to share my experience with you.

To know my backstory and reasoning for starting up this journey, please see this article.

Ouss

Introduction

I recently had to configure an OAuth authentication between Exchange 2016 and Exchange Online/Microsoft Teams backend services.

We can’t use the Classic full hybrid/Exchange Online yet so this is the only option for now to make the calendar available in Microsoft Teams (and let me tell you, the people are demanding this option as it makes working with Teams on every device much easier when your meetings are in the app).

Another request was that users want to generate Microsoft Teams links in Outlook for delegated mailbox. I will explain both scenarios below and the issues we countered.

Explore the different sections of this blog:

1. Introduction
2. The challenge
3. The other challenge
4. Conclusion

The challenge

The prerequisites are not really clear for some functions (if you go through multiple sites you may find it somewhere) so I will summarize the need to knows and the potential issues you may find.

Need to know for the  Oauth connection:

  • Configure the steps mentioned here.

Need to knows for creating a MS Teams link in Outlook in a delegate mailbox:

  • Configure these steps
  • User/Shared mailbox user accounts need to have a routable UPN (mailbox1@….com instead of mailbox1.xxx.local)
  • User/Shared mailbox user account needs to be synced to the cloud
  • Users need delegate access on the mailbox
  • Permission may need to be reapplied


The steps and issues will be talked about below.

According to Microsoft, CFH (Classic full hybrid ) is needed when trying to connect Exchange (on-premise) with the MS Teams backend.
Microsoft says the following about it:

Completed configuration of your hybrid deployment using the Hybrid Deployment Wizard. For more information, see Exchange Server Hybrid Deployments.

Microsoft Learn

I had a little discussion with MS Support as I knew this was not needed and eventually they took back their statement.

So we started with going through all the steps and the networking part gave some issues as we have a complex network setup with multiple firewalls/F5’s etc.

The issues got solved with the different IT teams and we managed to get this beautiful button in Microsoft Teams:

The meetings started to show up and everything seems fine for now.

Now the other challenge, creating MS Teams meeting in a delegated mailbox.

First up, couple prerequisites are seen below and another important one is to configure the steps mentioned here.

One of the reasons to enable Exchange and MS Teams integration was the use of Teams meeting links in outlook and in delegated mailboxes.
We did intensive testing to see if everything worked as expected but we rang into one big issue (which we kind of saw coming) and that is “Delegating issues“.

This means that a shared mailbox or delegated mailbox will not get the Microsoft Teams link in Outlook and wil not work only when having a delegate permission role and sometimes you need to reapply the permission for it to work.

Because we are not using hybrid exchange we didn’t sync the user accounts associated with the shared mailboxes before. This is needed so the Teams backend api can talk with exchange and change the UPN to a routable domain name ( in the logs there are multiple steps that the Outlook MS Teams add-in needs to take before giving this MS Teams link:

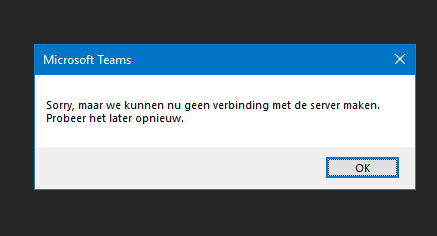
But when trying to plan a Delegated mailbox you would get one of these errors:

The infrastructure is maybe causing this issue but when you open the delegated mailbox in OWA (outlook web app) and assign the delegate permission (or reassign the permission if it doesn’t work right away) it works like expected.

If you try again you will see the link in the shared/delegate mailbox:

Conclusion

In summary, navigating OAuth authentication and Microsoft Teams integration can be quite the adventure! I hope my journey has shed some light on these challenges.
This is the end of my first blog post. I hope you enjoyed reading it and maybe learned a thing or two in the process.


Let me talk to ya (introduction)

Hi There,

I am thrilled to embark on this digital journey with you as we launch Ouss in the Cloud by Ouss Enterprises.
It’s a blog/digital space made with passion and for knowledge, good to knows and all things IT.

As a seasoned Technical Consultant deeply immersed in the world of Microsoft 365, my mission is clear: to make the intricacies of IT not only understandable but enjoyable for all. Whether you’re navigating the cloud, exploring Microsoft 365 projects, or delving into the complexities of Intune, Autopilot, PowerPlatform, SharePoint, Microsoft Teams, and Microsoft Entra – consider this hub your go-to resource.

My dedication extends beyond project engagements – I am here to share insights, provide guidance, and foster a sense of community within the ever-evolving IT landscape. Expect meaningful, fun, and great posts tailored to engage and assist professionals and enthusiasts alike.

So join me on this ride through all things IT. Together, we’ll turn challenges into opportunities and hopefully make this thing a fun and learning experience.

Cheers,
Ouss